


This is the final part in our guide in getting Watchguard Single Sign on working in your active-directory environment.
See here for links to Part 1 and Part 2
Last time we covered installation of the SSO client agents on your end users Windows devices, now we need to get the Watchguard appliance using the SSO agents and understanding user group membership.
Configuring the Watchguard to use Active Directory
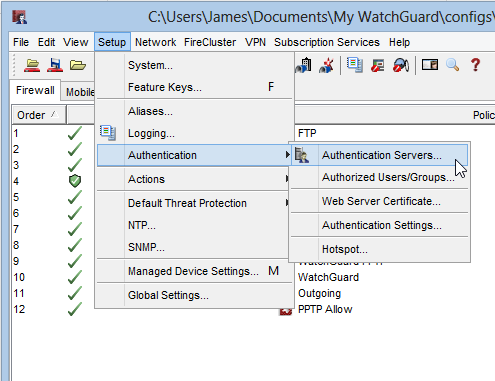
Using the Watchguard system manager suite connect to your Watchguard appliance, open Policy Manager and head on over to “Setup > Authentication > Authentication Servers…”
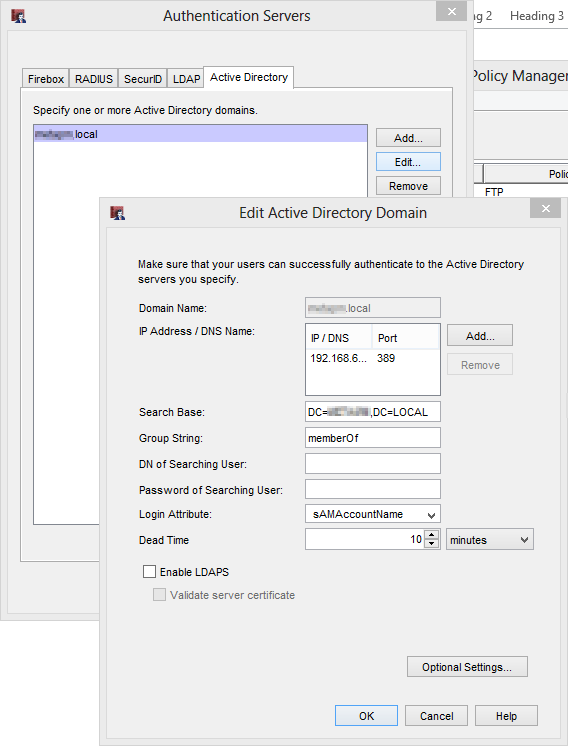
On the Authentication Servers dialog box, Click on the Active Directory Tab and then “Add…” a new box will appear asking for your AD details.
Enter your Domain name in DNS format. IE: “domainname.local” and add the IP addresses of your Active Directory Domain Controllers.
In the Search Base box you can enter where in your AD tree you wish the Watchguard to search for users and groups.
Standard LDAP syntax applies here. If you’re not sure on the syntax, you can get it to search your entire domain by using;
DC=DOMAINNAME,DC=LOCAL
(for domainname.local domains)
Or
DC=DOMAINNAME,DC=COM
(for domainname.com domains)
Keep in mind, if you have a large AD tree, this can significantly slow LDAP requests, so if your not sure speak with your AD specialist.
Leave Group string: as “memberOf”. Anything else will require the Watchguard to have its own user on your AD infrastructure to look users up
DN of searching user and Password of searching user can be left blank unless you change the above setting.
If you don’t fill in “DN of searching user” in the Watchguard will use the credentials of the user that’s authenticating to do the actual lookup on the DC, this is expected behavior.
Click OK twice and head back to the Policy manager main window.
More information about the AD integration in policy manager can be found here.
http://www.watchguard.com/help/docs/fireware/10/en-US/index_Left.html#CSHID=en-US%2Fauthentication%2Fusermanagement%2Factive_directory_bind_error_f.html|StartTopic=Content%2Fen-US%2Fauthentication%2Fusermanagement%2Factive_directory_bind_error_f.html|SkinName=Fireware (en-US)
Enabling SSO on the Watchguard
Note: AD authentication must already be configured for this to work.
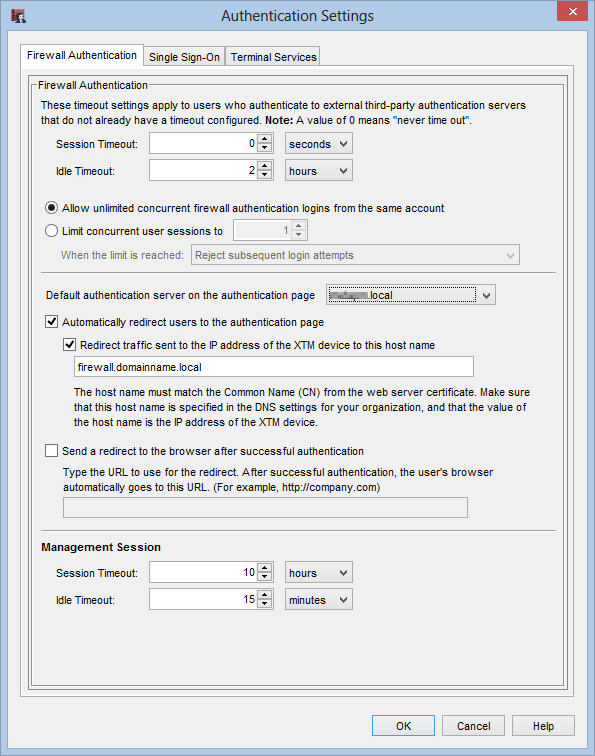
In policy manager head over to “Setup > Authentication > Authentication Settings…” and you should be presented with the default authentication settings.
On the “Firewall Authentication” tab, Enable the “Automatically redirect users to the authentication page” and fill in your XTM devices hostname if it has one. Change the default server on the authentication page to your domain name (Note: older firmwares will just display “Active Directory”)
This enables the Watchguard to display a login page instead of just dropping packets if the SSO client or the Log Viewer aren’t functioning or the user is on a mobile device.
The Watchguard will query your domain controller directly if users are presented with this page. Making it a nice Failback for non-domain joined and BYOD devices.
Note: Rumor has it this changes in newer versions of XTM 11.8. The watchguard will monitor a users attempts to authenticate over ActiveSync and if the connection is successful, will bind the device to that user. if this is the case I will do a follow up article
On the single Sign-On tab key in the SSO agent IP address, You can also key in addresses the Watchguard will never attempt to contact the SSO agent (like on a guest wireless network) so normal policies will apply.

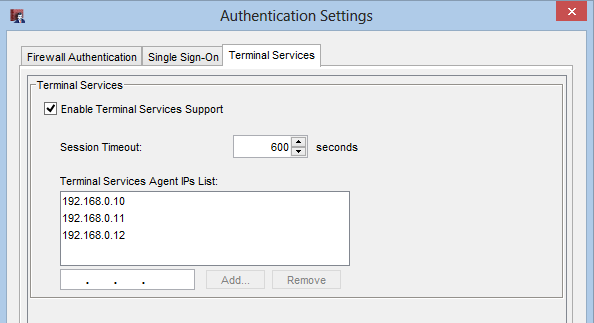
And over on the Terminal Services tab you can enable Terminal Services support and add the IP addresses of your Terminal / Remote Desktop Services servers running the Watchguard TS agent
Click OK and save your configuration to your XTM appliance as you normally would.
That’s it.. SSO is configured. Phew
Let’s briefly cover testing and using it!
Setting up groups and testing SSO authentication for use in the real world.
So to summize, The Watchguard only challenges you for authentication unless you hit a deny rule AND there is a rule requiring you to be a member of a group before the deny rule.
In policy manager lets create 2 new policies.
The first one allows access to ping a certain host if the user is a member of a group.
The second will drop all packets to that host.
First, we add the “Allowed group” in our Watchguard. This must already exist in your AD infrastructure and contain the user we are testing with.
We’re not going to go into specific rule or AD group creation. These are things documented well elsewhere.

In Policy Manager goto “Setup > Authentication > Authorized Users and Groups” to see the local users on the Watchguard (you may have VPN users in here already) click on “Add…” and fill in the details below
Name: This is the name of the Security Group in your AD infrastructure
Description: Type something meaningful here
Type: Should be set to group. The WG can find users on its own.
Authentication Server: Select the relevant domain (older devices, select “Active Directory”)
Leave the rest of the items as their defaults and click OK twice.

Create a new Ping policy and call it something like “WG Auth Test”
In the From address remove “Any-trusted” and add the group we created before (Add.. > Add User… Change the type to Group, Double click the group)
In the destination add something like 8.8.8.8 (remember, this is only for testing)
Create another rule just below this one. Denying all ICMP traffic from any-trusted to 8.8.8.8 and upload this config into your appliance.
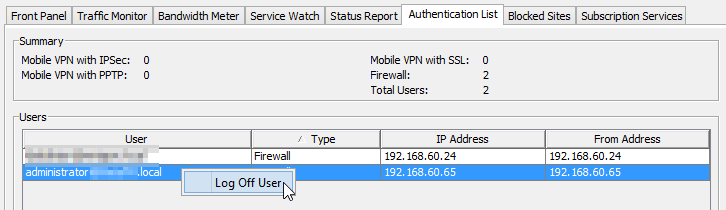
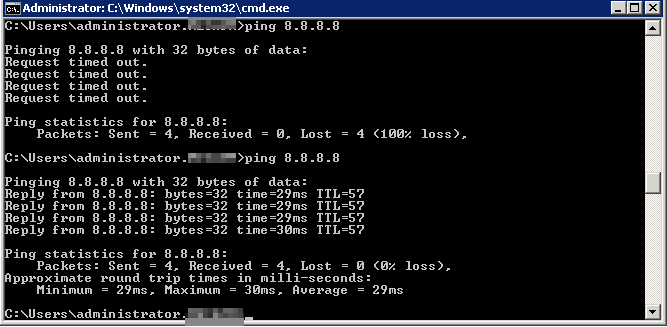
Now, without adding your test user to the “allowed” group. Trying pinging the blocked host. This should be denied and you will see that the Watchguard automatically authenticated you using the SSO client (Check system manager > Authentication list)

Now add your testing account to the “allowed” group and try pinging that host again.
By default you will need to wait 10 minutes for the Watchguard to check if you are a member of that group again. You can speed things along by booting your authenticated user out in System manager by right clicking them and clicking “Log Off User” or you can restart the Firebox.
Pinging again shows we can now hit the remote destination
You can now remove the 2 testing rules as we have verified the SSO client is working and the appliance is applying rules correctly.
Now you can feel free to write your own rules that apply only to a specific set of users. For example Http(s)/TCP proxies, One applies to a privileged set of users or a HR department and the other rule is stricter. This also allows for very granular reporting, seeing exactly what user is doing what. Rather than just an IP Address.
We will cover those items and getting some In Depth reports our next set of Watchguard articles.