


Imagine this, you’re in the middle of a pandemic, your entire state is in lockdown, everyone is working from home and your Skype infrastructure was never designed to facilitate 100% of users working externally. Now due to the platform struggling, your boss has just told you to move your businesses calling to Teams NOW with a shoe-string budget and an impossible timeline. What do you do?
Well, first. Start thinking about Change Management, Compliance, and Security as Teams is A LOT more than just Calling, Meetings and Chat. It’s the entire Microsoft 365 stack!
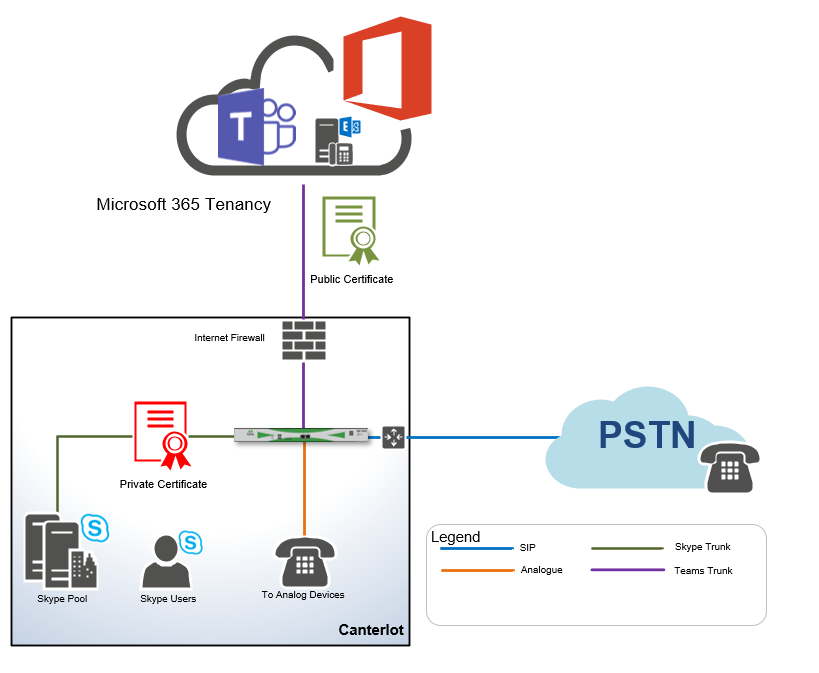
But as for the calling component, it’s actually pretty simple. Create a new trunk to Teams from your existing Skype SBC’s to Microsoft 365 and use Direct Routing, right?
You might even have seen my fellow Melbourne UC Meetup organizer Damien Margaritis excellent guide on Setting up a Sonus for Direct Routing, but, it assumes that your SBC isn’t already talking to Skype4B.
Sonus and Certificates
There is a small problem with that. As your SBC’s are in use by your Skype deployment, they typically have internally signed certificates on them, which aren’t supported by Microsoft 365.
Unfortunately, changing the existing SBC certificates means changing DNS names and breaking all your existing Skype trunks, which breaks all your voice routes. Not fun.
The solution is to install multiple certificates on your SBC, one for connecting to your existing Skype infrastructure and one for the Microsoft 365 connection.
It’s been easy for the AudioCodes fans like Lee Ford as they have supported multiple certificates for quite a while. While Sonus/Ribbon users like Greig and I might have RegEx, we didn’t get multiple certificates until July of 2020 with Ribbon firmware version 8.1.
Unfortunately, most articles talking about setting up a Direct Routing trunk were written before firmware 8.1 was released and as such may incorrectly point out this isn’t possible.
Regardless, in this article, were going to run through configuring an existing production Sonus or Ribbon SBC with a Supplementary Certificate and connecting to Microsoft 365.
Incase you want the more technical details, you can find the Ribbon documentation here. (Sonus Portal account required)
Getting Started
Firstly, you’re going to need a Sonus (or more correctly…) a Ribbon SBC connected to your existing SIP trunk/PBX/Skype4B. Additionally, your SBC will need;
- Firmware Version 8.1.5 or later (9.0.2 or better recommended, see below)
- A secondary IP address, using either Multiple IP’s on the same Interface or a secondary interface for WAN connectivity.
(Second Interface recommended if you want to implement Local Media Optimization) - A public DNS entry for your SBC’s WAN IP (as per Damiens article)
- A method of publicly signing the certificate with said DNS name
- (Optional) SILK codec licences
(These are free now, speak to your Ribbon reseller)
- (Optional) Wideband codec licences for AMR support
(Most carriers support G722.AMR these days, the codec your mobile phone uses for HD, VoWiFi, and VoLTE)
Warning: There is an issue on Ribbon SBC’s with separate TLS profiles using the same port on 2 separate IPs/interfaces. So you may need to use different ports for internal and external traffic. This has been resolved in fimware 9.0.2
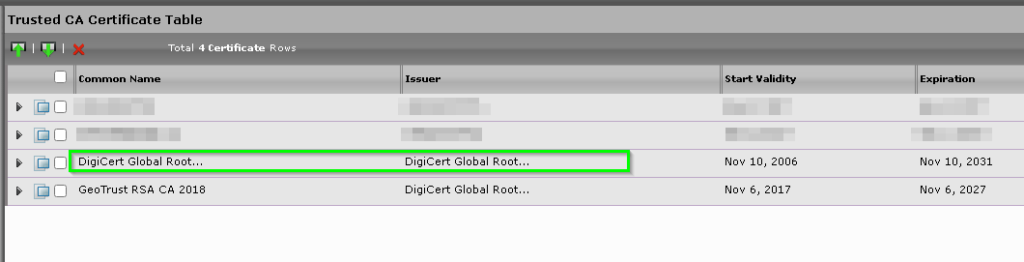
Primary Certificate
Here we can see on the existing SBC, we already have a Primary Certificate installed signed by an Internal CA.
As mentioned earlier, this certificate is not suitable for use with Microsoft 365 but is still required to communicate with the current Skype for Business environment.
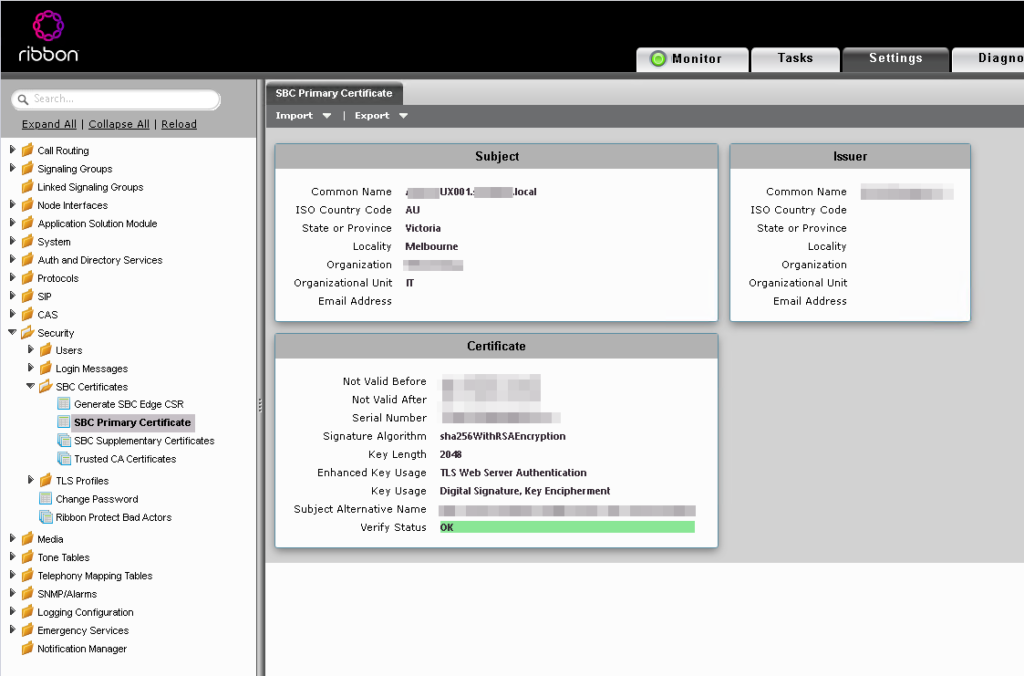
This is the remain the default or Primary certificate on the SBC and will be used for things like the web interface and the certificate tied to the Default TLS Profile.
Firewall Rules
Before we get too excited, you want to review the Firewall Requirements for Direct Routing over on Docs.Microsoft.
The rules below are correct at the time of writing.
Note: SBC Trusted is the SBC’s inside interface and
SBC Public is the internet-facing interface. This interface can live in a DMZ, or be on a 1:1 NAT.
DNS configuration should remain internal to keep compatibility with the existing Skype Environment. These DNS servers must be able to resolve external hostnames.
SBC Management
| Description | Source Address | Source Port | Destination Address | Destination Port |
| DNS | SBC Trusted | 1024-65535/tcp 1024-65535/udp | Internal DNS servers | 53/udp 53/tcp |
| NTP | SBC Trusted | 1024-65535/tcp 1024-65535/udp | Internal Domain Controller | 123/udp |
| Certificate CRL | SBCs Public | 1024-65535/tcp 1024-65535/udp | 0.0.0.0 (or, find the CRL for each certificate in use and exclude that) | 443/tcp |
| Device management | Internal Management Servers | 1024-65535/tcp 1024-65535/udp | SBC Trusted | 80/tcp 443/tcp |
SBC to Microsoft 365
| Description | Source Address | Source Port | Destination Address | Destination Port |
| SIP Signaling Office 365 to SBC | Office 365 Media Relay/Processor 52.112.0.0/14 52.120.0.0/14 | 1024-65535/tcp | SBC Public | 5061/tcp |
| SIP Signalling SBC to Office 365 | SBC Public | 1024-65535/tcp | Office 365 Media Relay/Processor 52.112.0.0/14 52.120.0.0/14 | 5061/tcp |
| SIP Media Office 365 to SBC | Office 365 Media Relay/Processor 52.112.0.0/14 52.120.0.0/14 | 1024-65535/tcp | SBC Public | 3478-3481/udp 49152 – 53247/udp |
| SIP Media SBC to Office 365 | SBC Public | 3478-3481/udp 49152 – 53247/udp | Office 365 Media Relay/Processor 52.112.0.0/14 52.120.0.0/14 | Defined on SBC, 16384 – 16484 by default |
Warning! Try to avoid D-NAT/Port Forwarding. Firewalls are notorious for dodgy SIP ALG implementations. Let the SBC do its job, it’s the SIP firewall after all!
(I had a “security firewall” vendor that would open 5060 to the world if it saw a single SIP register packet. You can be sure I reported that bug!)
External Clients – Media Bypass
If you want Media Bypass, (and you should unless you’re using VDI) you will need to implement these rules as well.
| Description | Source Address | Source Port | Destination Address | Destination Port |
| External Media Client to SBC | Any-External Any-Internal | Defined in the Teams Admin Center. 50000-50019 tcp/udp By default | SBC Public | Defined on SBC, 16384-16484 tcp/udp by default |
| External Media SBC to Client | SBC Public | Defined on SBC, 16384-16484 tcp/udp by default | Any-External Any-Internal | Defined in the Teams Admin Center. 50000-50019 tcp/udp By default |
Note: VDI/WVD Does not support Media Bypass. Unfortunately, the failback to Media Proxying doesn’t work very well either. If you have VDI instances, you need to set up a second “virtual” without media bypass.
Internal Clients – Local Media Optimization
If you’re looking to implement Local Media Optimization (there be dragons here, I’ll be writing a simpler article in the future) you will also need to add the following rules.
| Description | Source Address | Source Port | Destination Address | Destination Port |
| Internal Media Client to SBC LAN | Any-Internal | Defined in the Teams Admin Center. 50000-50019 tcp/udp By default | SBC Public | Defined on SBC, 16384-16484 tcp/udp by default |
| Internal Media SBC to Client | SBC Public | Defined on SBC, 16384-16484 tcp/udp by default | Any-Internal | Defined in the Teams Admin Center. 50000-50019 tcp/udp By default |
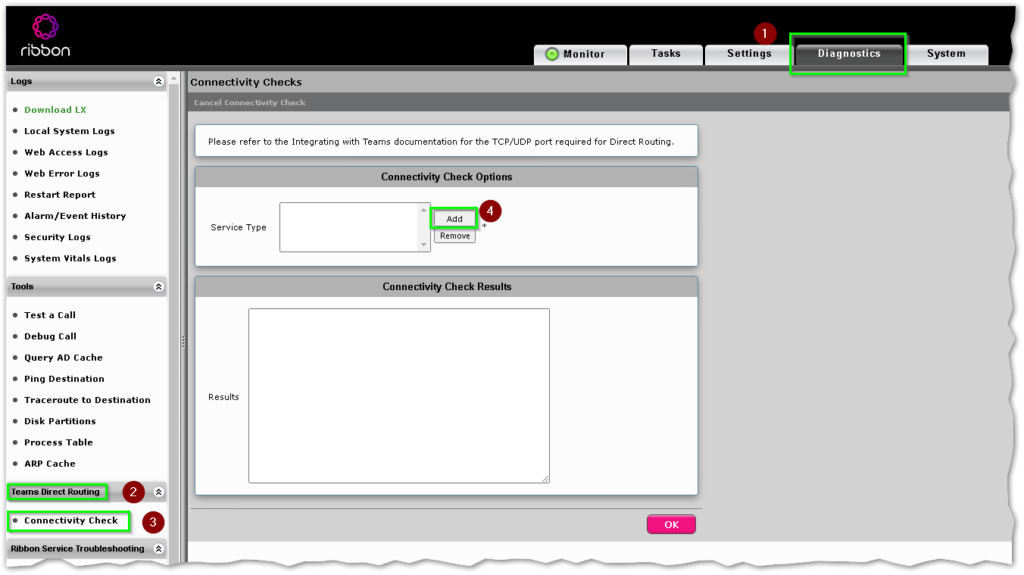
Check connectivity to Microsoft 365
Now that you have everything configured, you can use the built-in Ribbon connectivity test to ensure your customer’s network team have configured the firewall correctly.
Note: This test only tests DNS, NTP and SIP connectivity outbound from the SBC to Microsoft 365.
Media Proxy/Media Bypass/Local Media Optimization are not included in the testing.
To run the test, navigate to Diagnostics > Teams Direct Routing > Connectivity Check and then click Add
In the Select Service Type dialog, select every item and click OK.
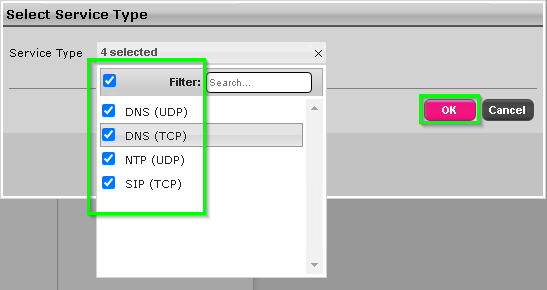
The connectivity test page will now fill up with all your specified services, scroll to the bottom and click OK.
Nothing may appear to happen at first, just wait. You likely have a connection issue, the SBC will eventually report what’s working and not.
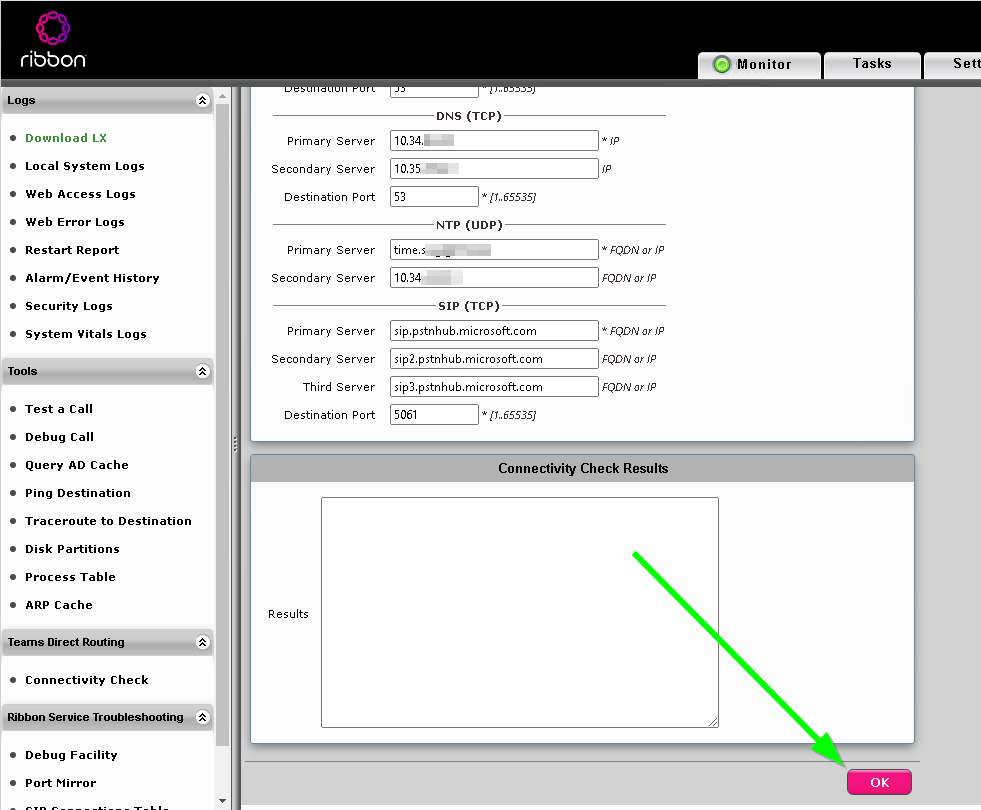
If you press OK too many times waiting you will need to reboot the SBC before the test will work again.
Example: Failed Test
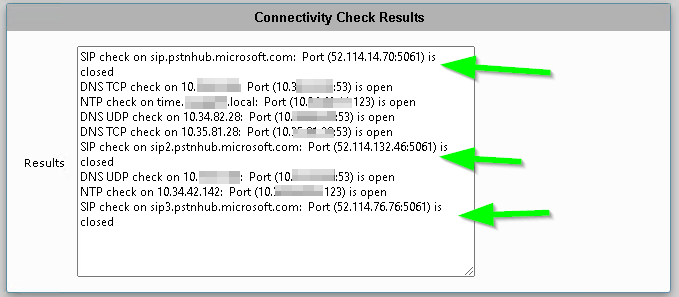
Notice the Closed readings for 5061? This would not allow for SIP connectivity to Office 365. All tests should pass with an Open otherwise the test is considered a failure.
Successful Test
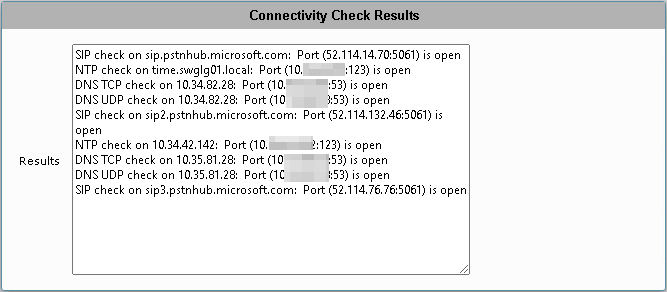
As we can see in this test in the above screenshot, all the tests passed with Open. Meaning that the SBC can reach out to Office365 successfully.
Reminder: This only tests Outbound connectivity!
Certificates
As the connectivity test was successful, let’s move on to getting the new certificate up and running.
Generate and Sign the Certificate
Using the usual method on your SBC, head over to Settings > Security > SBC Certificates > Generate SBC Edge CSR and fill in the details as normal.
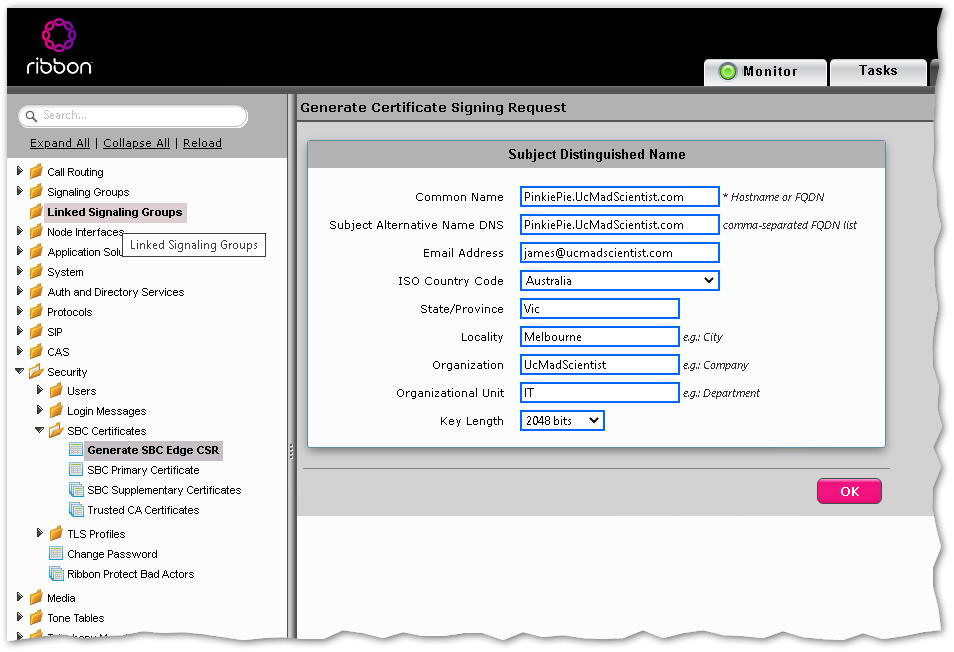
Take this certificate and get it signed using the usual method using a supported Certificate Vendor like DigiCert.
(They provide MVP’s with all the code signing certs we use, so I’m happy to give them a shout-out as thanks!)
Note: You can skip these steps if you are using a Wildcard certificate. Just make sure it supports RFC HTTP Over TLS
Upload the Secondary Certificate
Back on the SBC head over to Settings > Security > SBC Certificates > SBC Supplementary Certificates and click Import.

Choose the X.509 Signed Certificate option if you generated the CSR on the SBC, otherwise, chose the PKCS12 Certificate and Key option if using a wildcard certificate / CSR generated elsewhere.
If you’re using a PKCS12 certificate, you will need to provide the certificate password. Then press OK.

If you get an error when importing the certificate make sure you have the root certificate for the certificate installed as a trusted root!
Whilst you’re at it, import the Baltimore Root Cert as per Damien’s article to allow the SBC to validate the Microsoft certificate.
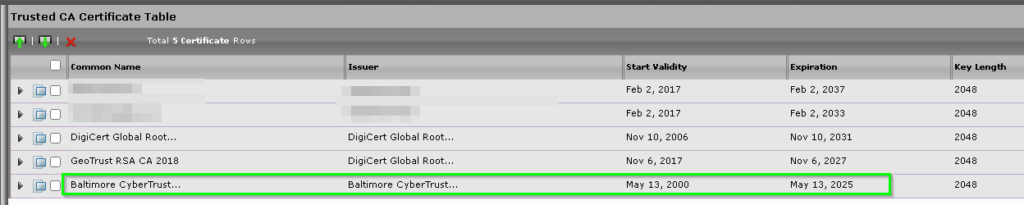
Once your new certificate is uploaded, it should appear in the list of supplementary certs.

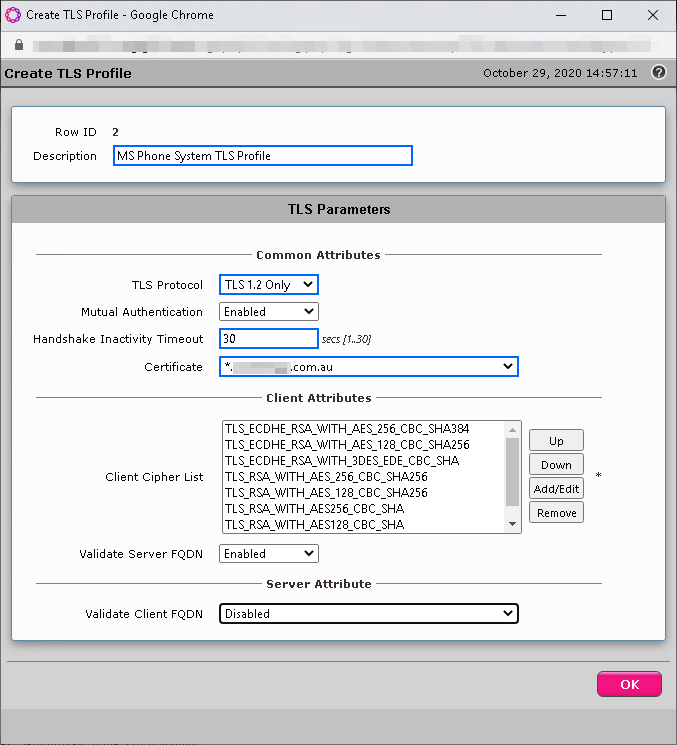
Create the new TLS Profile and Assign the Supplementary Certificate
Similar to a dedicated Direct Routing setup, navigate to Settings > Security > TLS Profiles and click on the Green Plus to create a new profile.

In the new profile make sure you configure the following;
- Description: MS Phone System TLS Profile
- TLS Protocol: TLS 1.2 Only
- Handshake Inactivity Timeout: 30 Seconds
- Certificate: Select your new certificate from the drop-down list
- Validate Client FQDN: Disabled
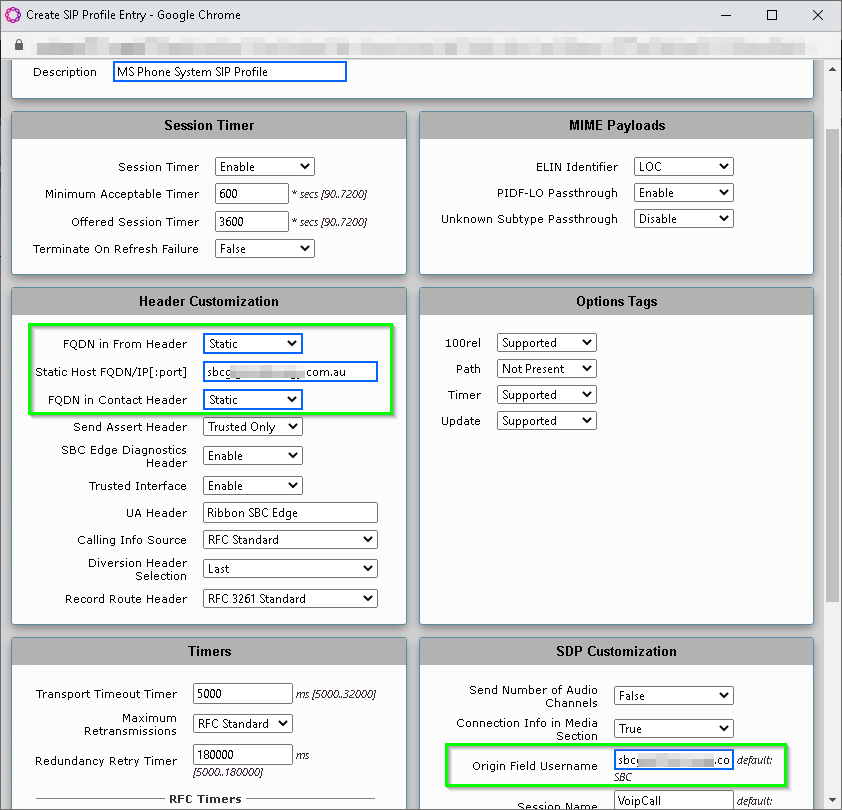
Create new SIP Profiles
As we are running an existing Skype environment, we need to make sure we don’t upset any of the existing SIP profiles, including the SBC FQDN.
As such we will create a new SIP profile by navigating to SIP > SIP Profile and pressing on the Green Plus again.

The difference here from Damien’s article is that we need to specify the SBC FQDN manually, as the preconfigured one is in use by Skype.
- Description: MS Phone System SIP Profile
- FQDN in From Header: Static
- Static Host FQDN/IP: The External DNS name for the SBC
- FQDN in Contact Header: Static
- Origin Field Username: The External DNS name for the SBC
Media Configuration
Damiens article goes into the old media config, but this has changed due to Teams now supporting DTLS media. However, it will always switch back to SDES. Google has mentioned they will drop SDES support in Chrome More information here so we will need to configure both.
SDES-SRTP setup
In the SBC settings navigate to Media > SDES-SRTP and click on the Green Plus
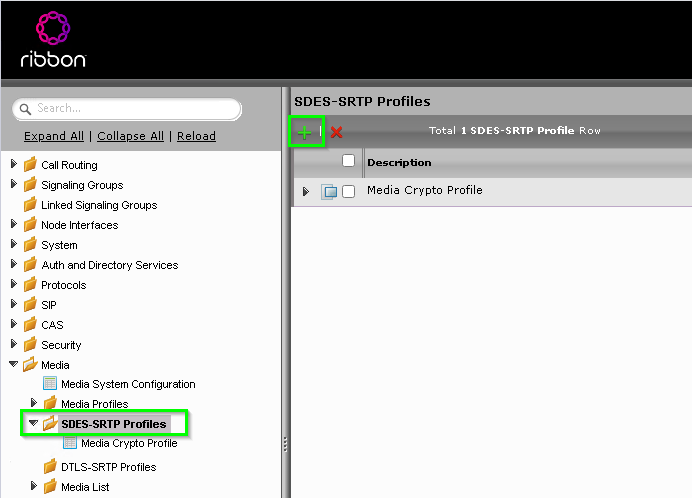
In the Create SDES-SRTP window, configure the following options
- Description: MS Phone System SDES-SRTP Profile
- Operation Option: Required
- Crypto Suite: AES_CM_128_HMAC_SHA1_80

DTLS-SRTP setup
Again, in the Media config, we are going to head Settings > Media > DTLS-SRTP Profiles and click the Green Plus
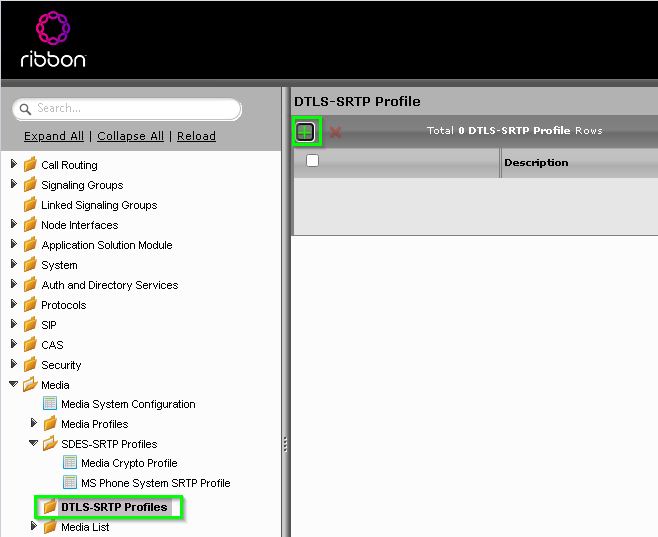
In the Create DTLS-SRTP window, configure the following options
- Description: MS Phone System DTLS-SRTP Profile
- Hash Type: DTLS_MEDIA_CRYPTO_HASH_SHA256
- Crypto Suite Sequence: Remove AES_CM_128_HMAC_SHA1_32
Codecs
We’re getting there, I swear! You should know the process by now.
in the SBC configuration, navigate to Settings > Media > Media List and click the Green Plus
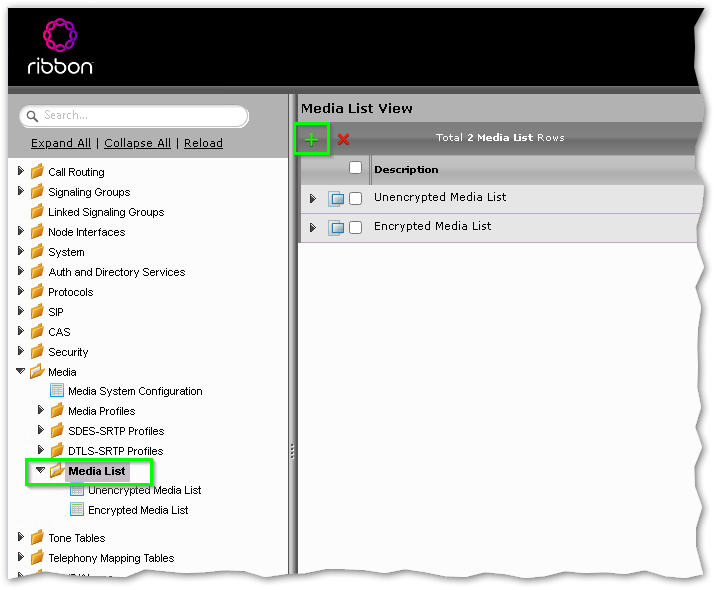
In the Create Media List window adjust the following settings
- Description: MS Phone System Media List
- Media Profiles List: Default G771A & Default G711u
(optional, you can also add SILK here if you’re licenced for it, more info here) - SDES-SRTP Profile: MS Phone System SDES-SRTP Profile
- DTLS-SRTP Profile: MS Phone System DTLS-SRTP Profile
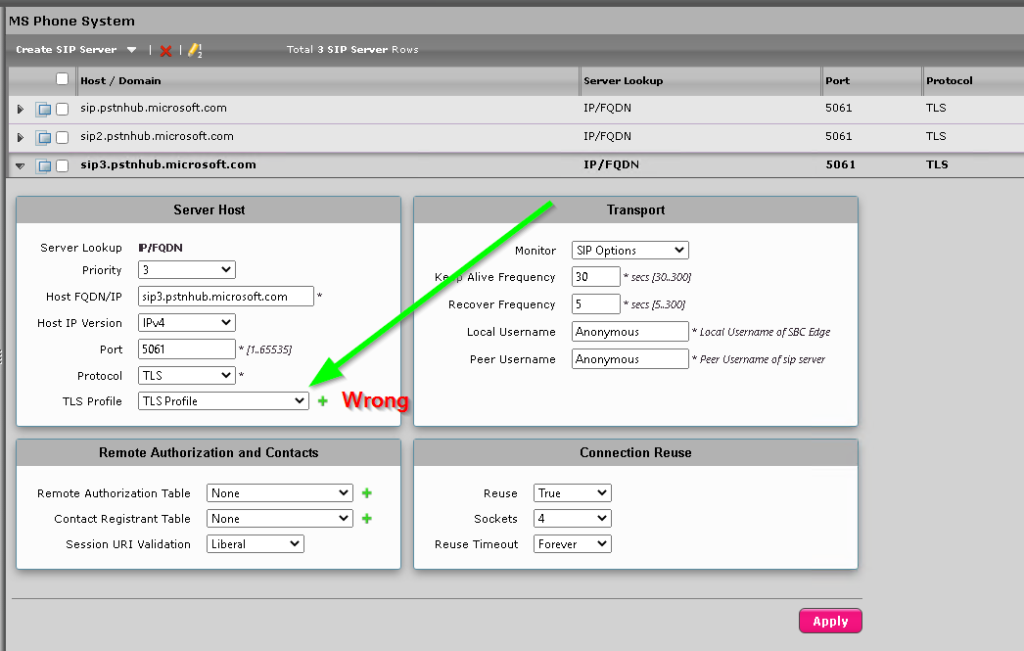
SIP Server Tables
Now lets setup the SIP server tables, again this is the same as Damiens article, navigate to Settings > SIP > SIP Server Tables and click the Green Plus

Name the new Sip Server Table whatever you like, but we stick with MS Phone System here, and click OK.
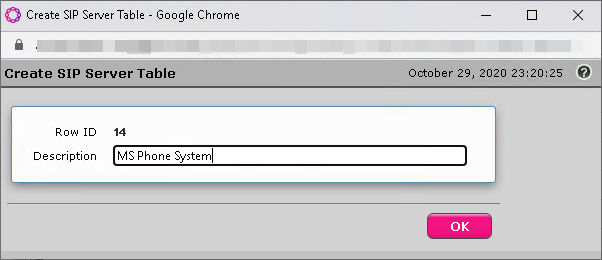
Now we need to add the servers to the table.
Click on the new MS Phone System SIP Server Table and click Create SIP Server then select IP/FQDN in the dropdown.

As with Damien’s article, create 3 servers with the following options
The following options are unique to each server;
| Host FQDN/IP | Priority |
| sip.pstnhub.microsoft.com | 1 |
| sip2.pstnhub.microsoft.com | 2 |
| sip3.pstnhub.microsoft.com | 3 |
These options are the same across all three.
- Port: 5061
- Protocol: TLS
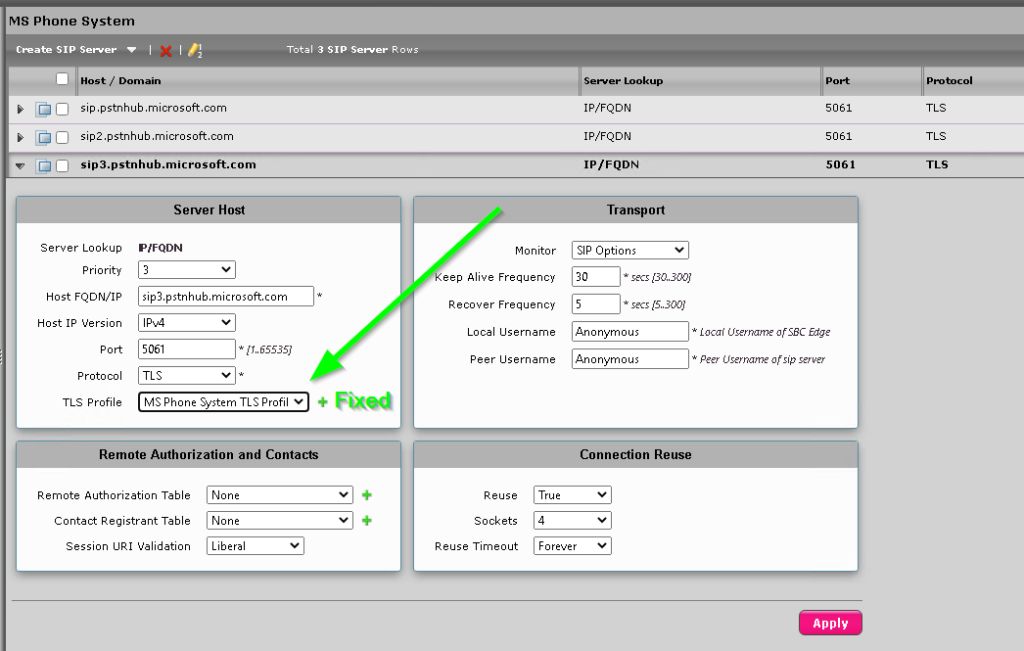
- TLS Profile: MS Phone System TLS Profile
- Monitor: SIP Options

Picking the new TLS profile here you created earlier will expose the new secondary certificate to Office 365
Once you’re done, you should have something like this.
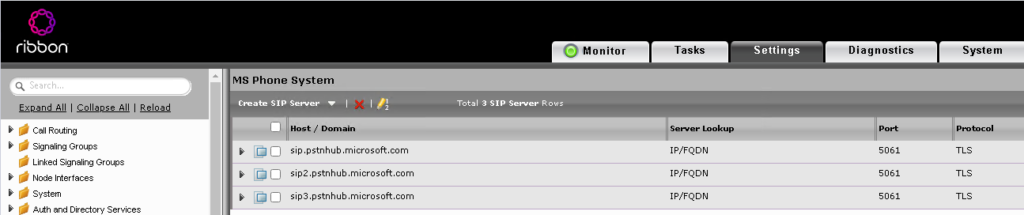
Routing and Translation Tables
Now, as you already have a Skype for Business deployment. You should already have transformation tables capable of matching E164 numbers and routing them appropriately.

I’m not going to dive “too much” into Translation and Routing tables as that’s specific to your environment. But I will point out some considerations
From Teams to Sip carrier Transformation table
If you’re not doing any Caller ID manipulation, you can typically reuse your existing “Skype to Sip Carrier” transformation table.
If not, be aware that Teams doesn’t use the msRTCSIP-Line AD attribute. So we need to modify our existing caller ID manipulation rules.
Duplicate the existing From Skype to SIP Carrier Transformation Table by heading to Settings > Call Routing > Transformation, selecting your existing Match to SIP carrier (1) rule and clicking the Copy (2) icon next to the red X.
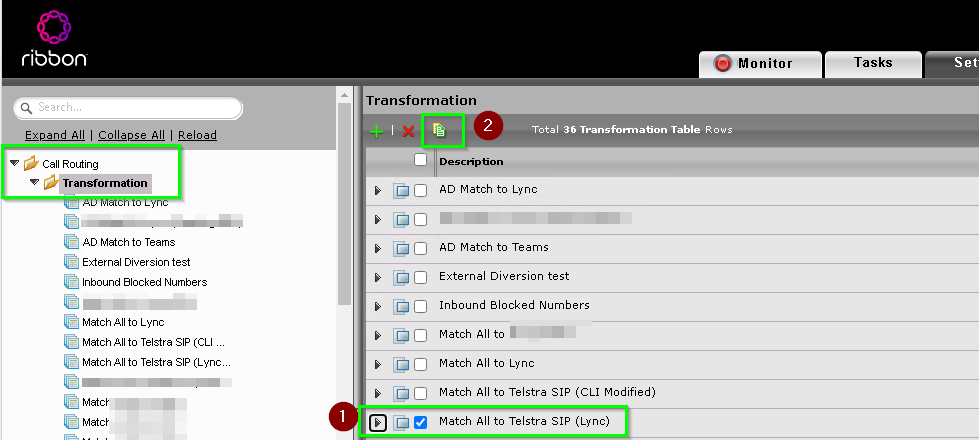
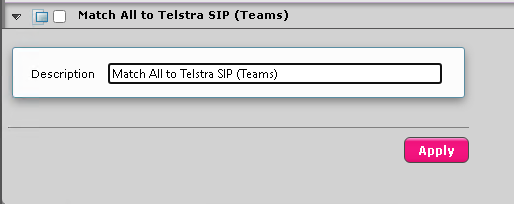
This will create a new rule called Copy of Match All to SIP carrier. Expand it and name it something more appropriate.
Now, we need to edit the Transformation Table by clicking it on the left under the Transformation tree entry.
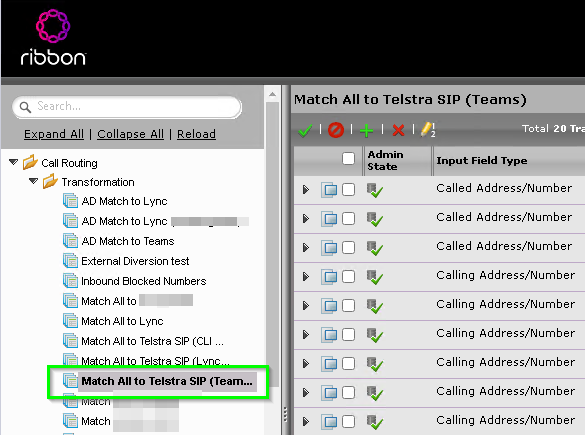
You can see I used to match a users AD attribute based on their =msRTCSIP-Line= in Skype for Business. Replacing it with whatever is in the =ipPhone= field.

Luckily, we can just change this to =telephoneNumber= in the Source match. Click the little arrow next to the Transformation Rule, change the value in the Input Field Value to =telephoneNumber= and press Apply
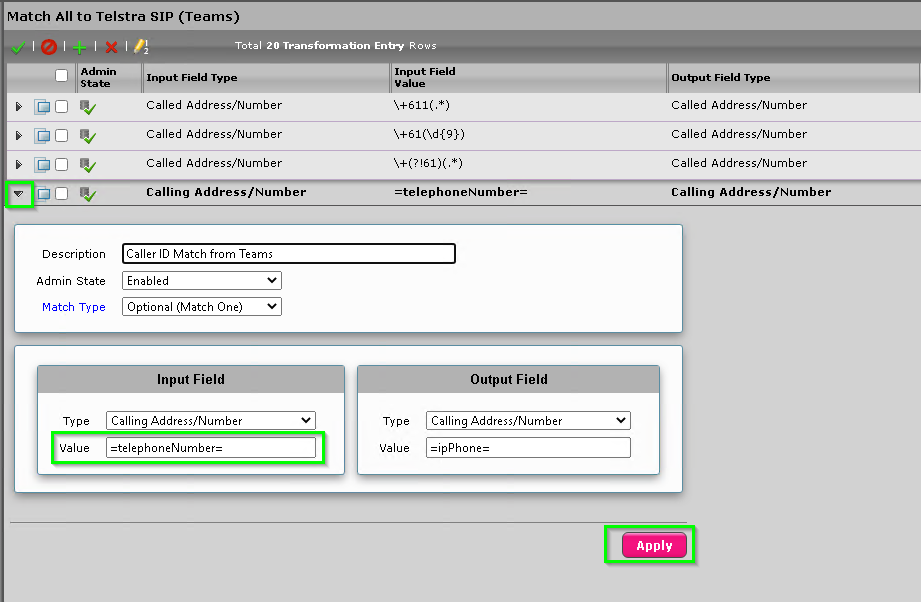
Whilst it looks like this is wrong, there is a feature in the Sonus SBC that wouldn’t replace the caller ID field with whatever was in the =ipPhone= field if it was blank.

It should be noted this won’t work if there are 2 matches (one for Skype and one for Teams) trust me, I’ve tried it.
Another Caller ID option
If you want a more elegant solution to this in case someone fills the =ipPhone= AD field with garbage. Luca Vitali has already come up with a considerably neater version over here.
I wont go into it too much but basically.
- Change the =msRTCSIP-Line= attribute to =telephoneNumber= and change the output field to User Value 1 with a value of =ipPhone=
- Create a new rule that checks to use if User Variable 1 contains a number, if so. Output =ipPhone= to Calling ID
- Create a generic rule that always matches User Value 1
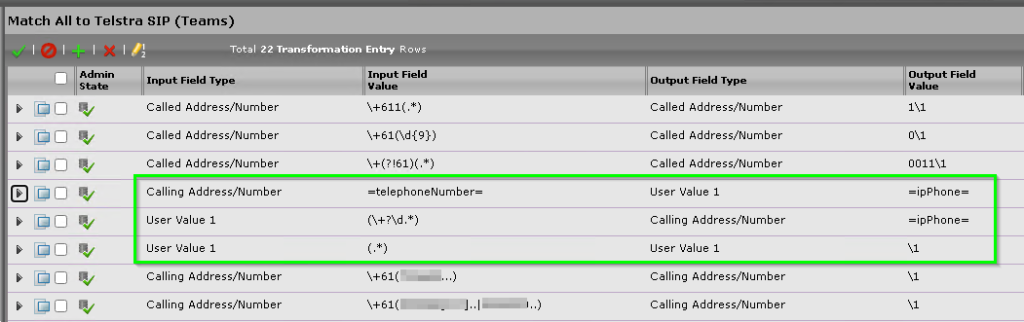
Keep in mind, you will need to have the always match rule for User Value 1 as now the transformation table will need to match ALL three attributes, Called, Calling and User Value 1 for the Translation Table to be selected as a valid route. This shouldn’t effect any caller ID masking rules you have as the calling number still won’t match.
Routing Tables
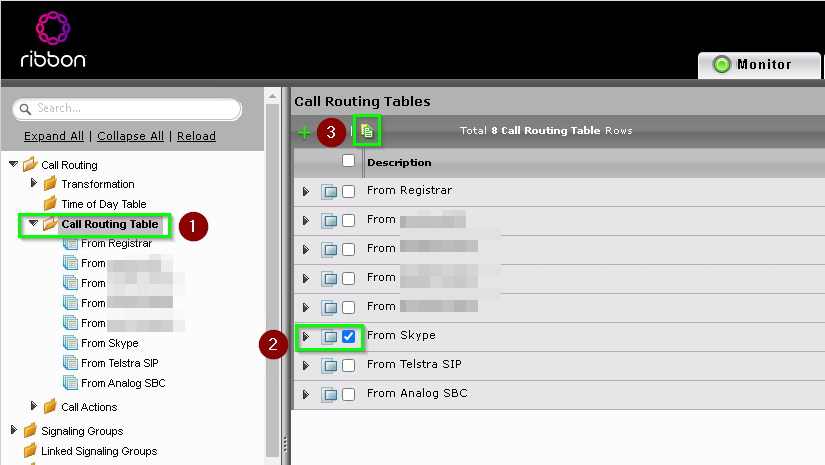
As we need the ability to route between Skype and Teams, we will need to copy the existing From Skype Routing Table for use by Teams
Simply go to Settings > Call Routing > Call Routing Table, click the checkbox next to your From Skype Routing table and then click the copy icon up the top.
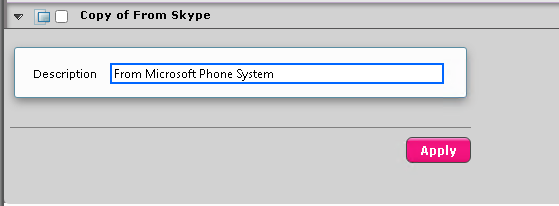
Now Expand the Copy of From Skype group and rename it From MS Phone System and click Apply
Modify this Call routing table to suit your needs
Now, don’t forget to add a match in your From Skype Transformation Table to match towards Teams and stick it above your Carrier Route
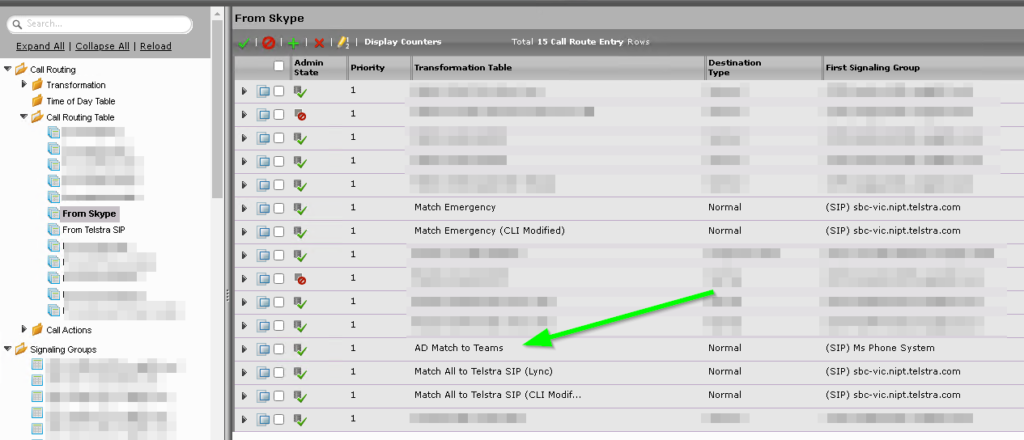
Setup Dynamic Routing Between Skype4B and Teams
Again Luca Vitali has a GREAT article on getting this to work over here, Grazie.
The only change from his method I use is matching the =telephoneNumber= AD Attribute instead of =msRTCSIP-Line=
But, again, if your after a quick version;
- Add “msRTCSIP-DeploymentLocator” to the AD Query Attributes on the SBC
- In the Transformation table;
- If there is a match in AD, Store a custom value of sipfed.online.lync.com in a user variable
- Compare that user variable against the AD “msRTCSIP-DeploymentLocator” attribute
- If they match, the user is on Teams!
- Add this new transformation rule as a route from the PSTN and Skype

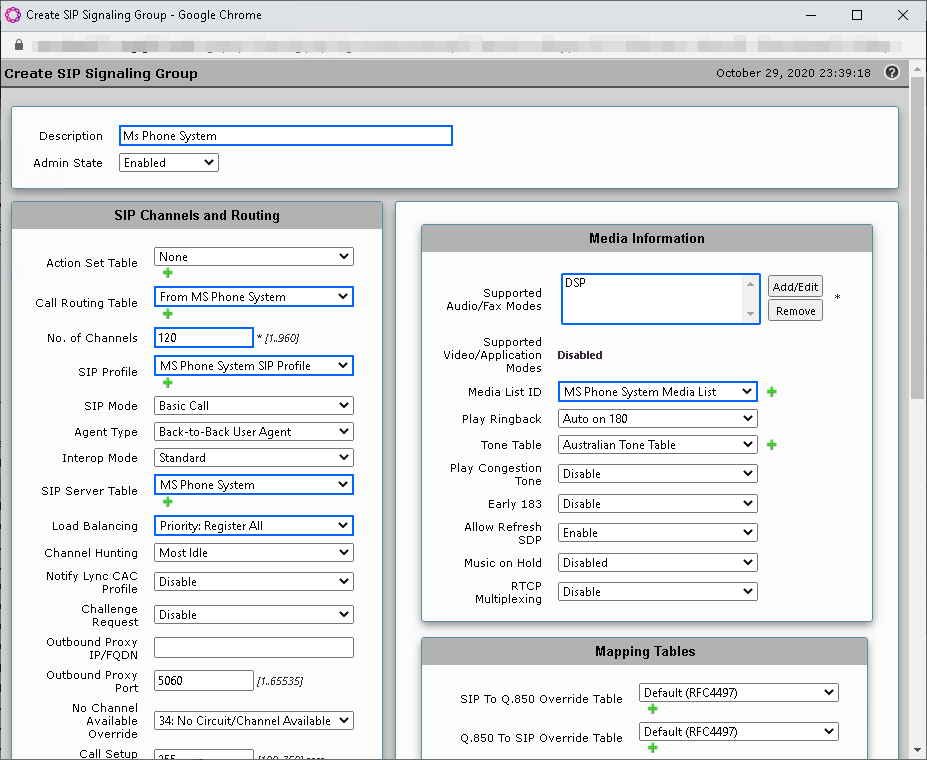
Signaling Group Setup
In the SBC head to Config > Signaling Groups and click on Create Signaling Group > SIP Signaling Group

Change the following settings
| Feild | Setting |
|---|---|
| Description | MS Phone System |
| Call Routing Table | From MS Phone System (That you created before) |
| No.of Channels | (Depends on your network and licences) |
| SIP Profile | MS Phone System SIP Profile |
| SIP Server Table | MS Phone System |
| Load Balancing | Priority: Register All |
| Listen Ports | 5061/TLS |
| Media List ID | MS Phone System Media List |
| Play Ringback | Auto on 180/183 |
| Early 183 | Enable |
| Music on hold | Enabled for SDP Inactive |
| Signaling Media Source IP | (Your SBC’s WAN interface) |
If you are enabling Media Bypass, Set ICE Support to Enabled and ICE Mode to Lite

Note: You must set your Teams trunk to bypass as well or calls will fail!

Static NAT – Only required if you are using 1:1 NAT, if your SBC has a public IP. leave it as Disabled
Getting Teams Direct routing Running
Tenant Setup
Credit where credit is due, the setup is exactly the same regardless of the SBC is split or not. So I’m going to direct you to Damiens Guide for that part but I will point you to some awesome tools for converting your existing Skype4B stuff and managing rules a bit easier.
Convert your Skype Voice rules to Teams Voice rules
Go grab this from The Hoff Ken Lasko and start converting all your existing Skype Dial Plans/Voice Routes to Teams Dial Plans/Voice Routes etc.
Fun fact, I ended up contributing a few features to this as a way to say “Thanks” for all Ken does for the MS UC community, you can help him out by buying him a beer!
After you have finished importing all your rules using Ken’s tool. Head over to MyTeamsLab.com and grab yourself James Cussen’s Direct Routing tool and cleanup any spurious or redundant rules.
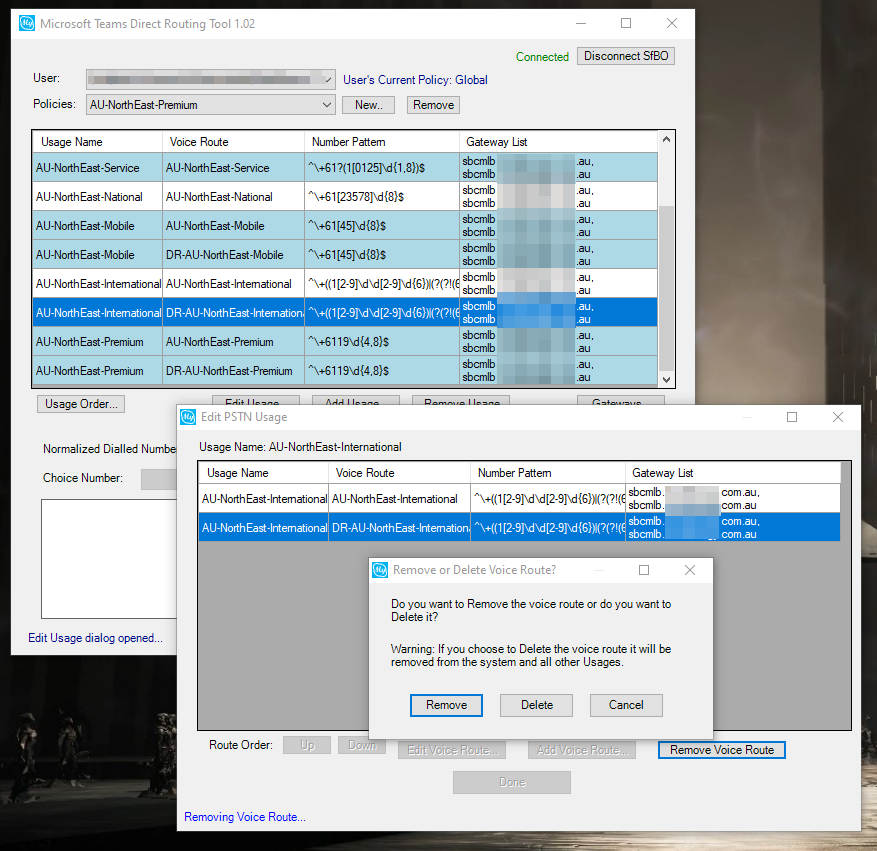
And that’s it your done!
Troubleshooting
Microsoft SBC Test
Once all that’s done, you can run this test to ensure everything is up and running
Check for Sip Messages from Office 365.
Look for 2xx responses from Microsoft, this usually indicates a “200 OK” in response to an Options message
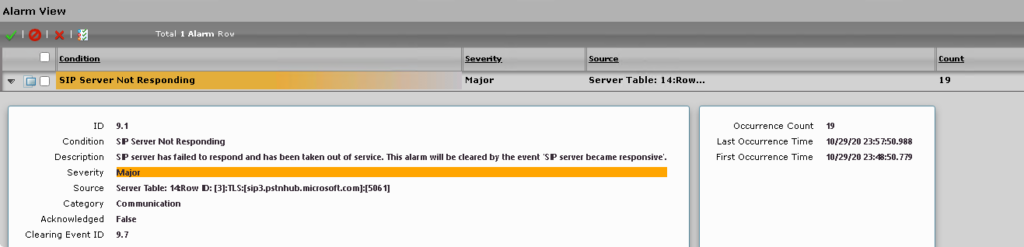
SIP Server Not Responding warning
If the firewall check passes and you get a “Sip Server Not Responding” warning or “SIP-TLS Server Handshake Failure”
Check your SIP Server Table and ensure you selected the correct TLS profile
There is a problem with the SIP OPTIONS.
You might receive the error message “There is a problem with the SIP OPTIONS.” in the Office365 Control Panel

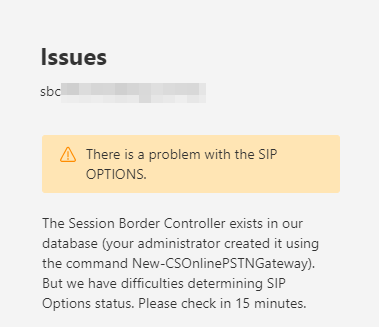
If your SBC is up but Office 365 thinks it’s down (As above) double-check your SIP counters for the signalling group
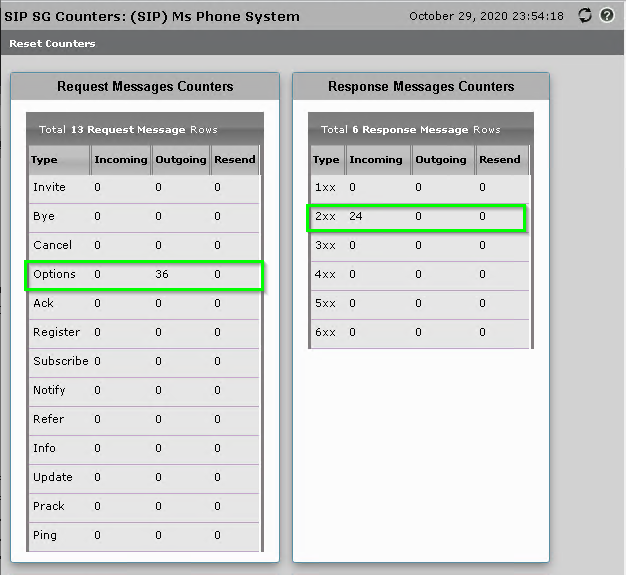
In this example, our SIP Options are being received by Office 365 and being responded too, which means certificate negotiation is passing, but Office’s own Options Requests aren’t getting to us.
Your most likely cause for this is your Firewall or Routing.
Excellent article. SBC firewall rules for SIP signalling IPs are incorrect. They are not 52.112.0.0/14 and 52.120.0.0/14.
Please review.
Thanks
everything works between teams and my sbc but i still get the occasional “SIP-TLS Server Handshake Failure” – any ideas?
I’ve limited the cypher profiles to the ones published by microsoft and not the longer list in these articles
HI Dave,
did you found an solution for the issue? I am facing same one currently.
BR
me too still get that issue
The reason for these warnings and errors is that there are many machines on the net that keeps scanning SIP servers on well know SIP ports trying to hack them to make calls.
To avoid these machines from scanning your SBC, you need to limit SIP communication only with Microsoft Teams server (SIP Proxy) which consists of these two ranges (52.112.0.0/14 and 52.120.0.0/14)
Keep in mind that limiting SIP to only the Microsoft SIP Proxies may break media bypass with VDI clients if your using it.
(I think they should all be using REST by now with Teams 2.0, but honestly I haven’t looked at a VDI client with media bypass in ages)
I personally don’t use media bypass it as in my opinion the Azure network is a lot better suited to distributing media to users than most of my customers networks due to their non voice optimized designs.
Also note, you should be protecting your SBC with both its internal firewall, and an external firewall